
Pipe Insulation Installation: Straight Runs, Joints, Fittings and Protection
Proper pipe insulation installation requires more than placing insulation around a pipe. The specified thickness must remain consistent, longitudinal and circumferential joints must close securely, and fittings and supports must not become weak points. On chilled-water and refrigeration lines, continuous vapor control helps prevent condensation. On hot-water and high-temperature industrial lines, service-temperature compatibility, fastening and external protection are critical.
This guide explains how to install pipe insulation using slit elastomeric foam tubes, preformed glass wool sections and preformed rock wool sections. The working sequence is: confirm dimensions and service conditions → prepare the surface → measure and cut → install straight sections → finish fittings and supports → complete vapor control or cladding → inspect the work. The sequence is shared, but joining and fastening details vary by material.

Three Checks for Pipe Insulation Installation
- Correct fit:Match the insulation bore to the pipe's actual outside diameter, not just its nominal designation.
- Continuous coverage:Avoid stretched pieces, open joints and insulation crushed by supports.
- Suitable protection:Use the specified vapor-control system for cold service and weather protection where exposure demands it.
Check Pipe Conditions and Dimensions Before Installation
Before pipe insulation installation, confirm the pipe's actual outside diameter, required insulation thickness, operating temperature and exposure conditions. Identify indoor and outdoor runs, below-ambient service, moisture exposure and any special project requirements.
For accurate pipe insulation installation, the insulation bore must fit the actual pipe outside diameter. A tight bore may compress the insulation or prevent a longitudinal seam from closing; an oversized bore may leave gaps. To determine how to install pipe insulation on piping designated by DN or NPS, first confirm the actual outside diameter rather than using the nominal number as the required bore. Consult the Pipe Insulation Sizing Chart and Pipe Insulation Thickness Chart when confirming dimensions.
Complete required pressure testing and inspections before starting pipe insulation installation. Correct leaks, standing water and visible corrosion, and ensure surfaces are clean and dry. Check site ventilation, cutting protection, adhesive application conditions and whether the system must be shut down during work.
For PEX, PVC and CPVC piping, verify the compatibility of the insulation, adhesives and other contacting materials with the pipe system as well as its temperature range. Certain plasticizers or solvent-based adhesives may be unsuitable, particularly with some CPVC systems. Do not transfer a metal-pipe installation method to plastic pipework without checking compatibility.
How to Install Pipe Insulation on Straight Runs
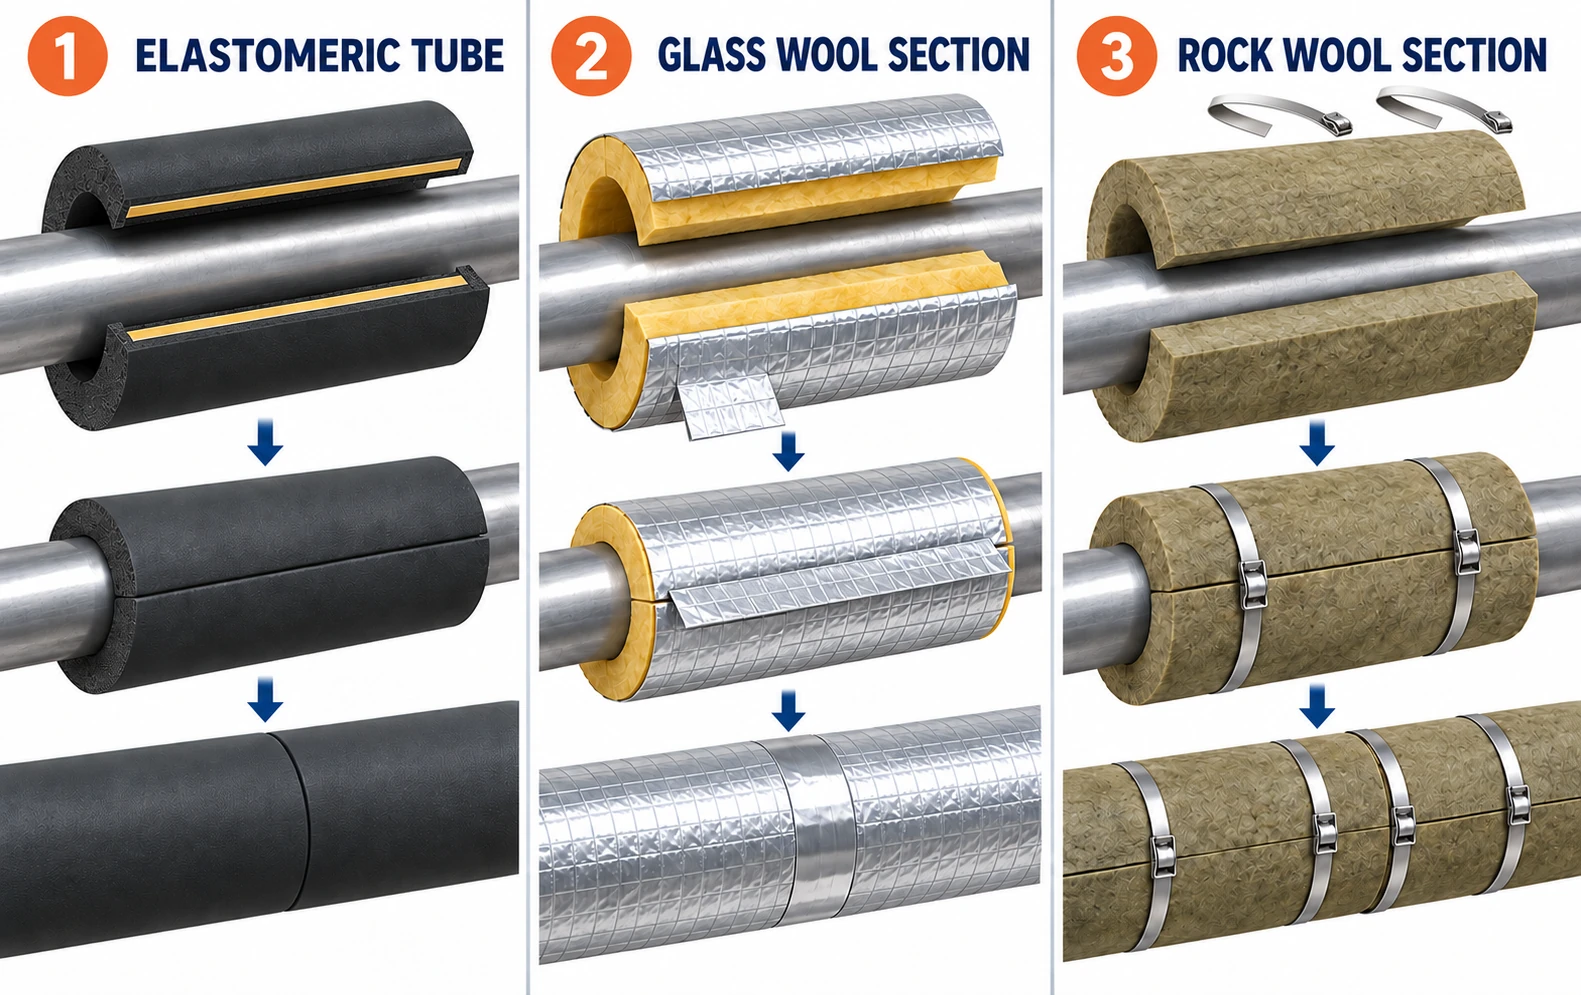
Installation methods differ by product form: slit elastomeric tubes use bonded or self-adhesive closures, faced glass wool sections need facing laps and compatible tape, and rock wool sections commonly use wire or bands. Follow the selected product's instructions when deciding how to install pipe insulation.
Slit Elastomeric Foam Tubes
For elastomeric pipe insulation installation on existing lines, place slit tubes around the pipe from the side, including runs with supports, valves or branches. Measure the length, cut squarely, open the slit and position the tube without twisting, stretching or compressing it.
For bonded closures, apply a compatible adhesive to clean mating surfaces. Where contact adhesive is specified, coat both surfaces as instructed, allow the prescribed flash-off period, then align and press them together. Close factory self-adhesive edges according to their instructions. Bring tube ends together closely and seal each circumferential joint with the specified method, as well as the longitudinal seam.
Do not stretch a short tube to fill a gap: shrink-back can reopen the joint. If a pipe end remains unobstructed, unslit tubing may instead be slid into place before fittings are connected. This is an alternative to consider when planning pipe insulation installation on new pipework.
Preformed Glass Wool Pipe Sections
For glass wool pipe insulation installation, open or separate each preformed section, fit it around the pipe and close the halves without compressing the required thickness. Fit adjacent ends together without continuous gaps.
For factory-faced sections, keep facing tabs clean and dry, secure the longitudinal closure and tape circumferential joints with compatible materials. Unfaced sections need appropriate fastening and any specified protective finish. On below-ambient lines, the facing and its closures must integrate with a continuous vapor-control layer; close-fitting glass wool alone does not provide a vapor barrier.
Preformed Rock Wool Pipe Sections
For rock wool pipe insulation installation, fit split sections closely around the pipe and secure them using suitable wire, metal bands or an equivalent specified fastening system. Tighten fasteners enough to keep the sections stable during vibration and cladding work, without crushing the insulation.
When deciding how to install pipe insulation in multiple layers, stagger longitudinal and circumferential joints to reduce through-gaps. At elevated service temperatures, check that fasteners, facings, supports and cladding are suitable as an assembly. The temperature rating of the insulation core alone does not establish the operating limit of the complete system.
Finish Elbows, Tees and Valves
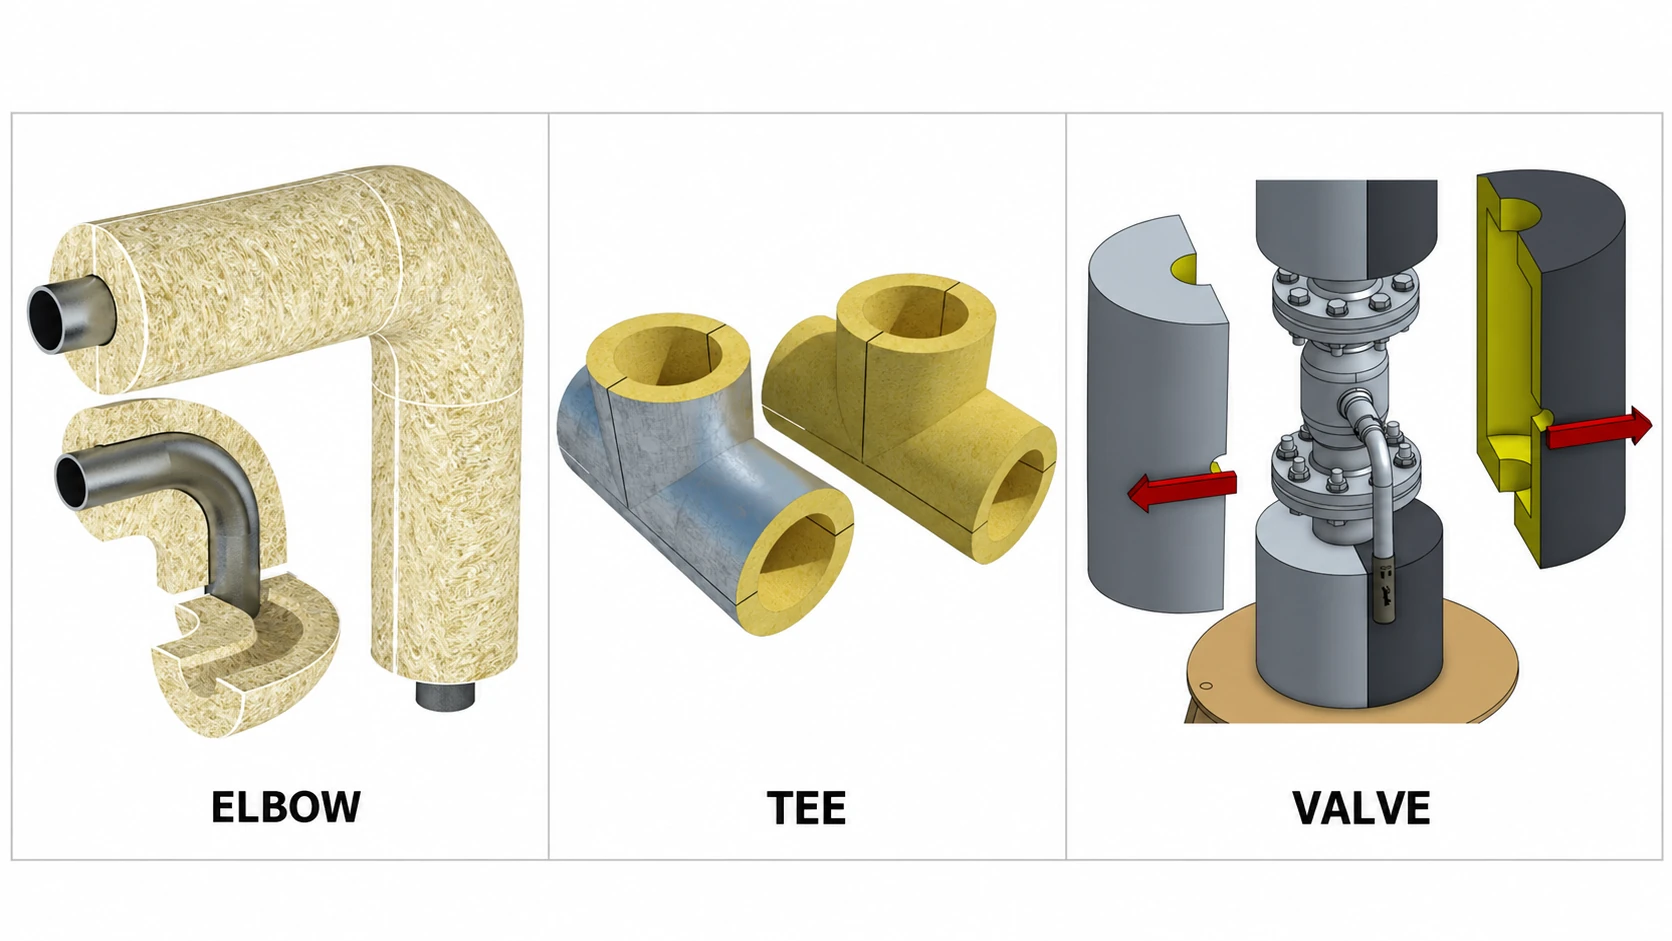
Knowing how to install pipe insulation around fittings means preserving thickness and closing joints where a straight section cannot simply continue. Open seams, exposed surfaces or excessive compression on an elbow's inner curve can compromise the run.
For pipe insulation installation at bends, use correctly sized formed fittings where available. Otherwise, measure and cut mitred segments to follow the bend, ensuring that their outer edges meet without gaps and inner edges are not compressed excessively. Flexible elastomeric tubing may follow gentle bends within its allowable limits; tight bends and larger diameters often require segmented or formed pieces. At tees, fit the branch to the main run and seal intersecting joints, particularly on cold service.
Valves, flanges, strainers and other serviceable components need insulation that permits maintenance. Removable boxes or sectional covers should connect with the adjoining insulation while retaining access. Where project specifications permit, matching fitting arrangements can reduce complex site cutting.
Detail Supports, Hangers and Penetrations
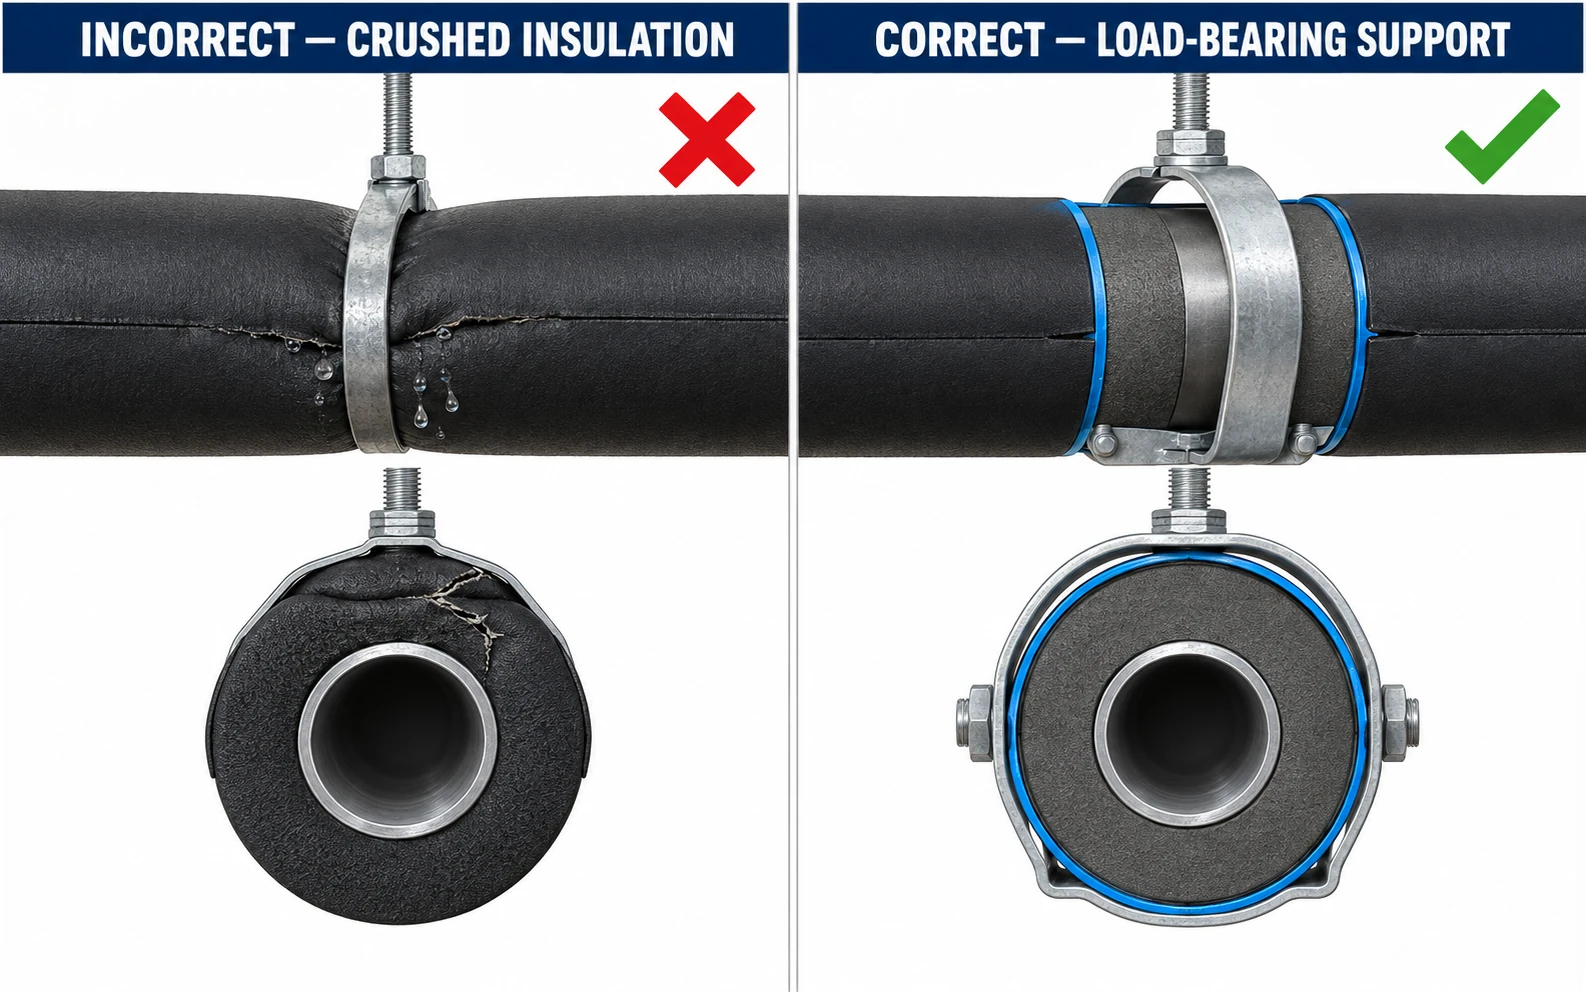
When planning how to install pipe insulation at hangers, account for load transfer as well as thermal continuity. Supports can compress soft insulation, create thermal bridges and, on chilled lines, become localized condensation points.
Effective pipe insulation installation at supports requires a detail suited to pipe load, operating temperature and the insulation's compressive strength. If soft insulation cannot carry the load, specify a load-bearing insulation insert, protective saddle or engineered support. The arrangement must prevent long-term crushing and preserve the required thickness.
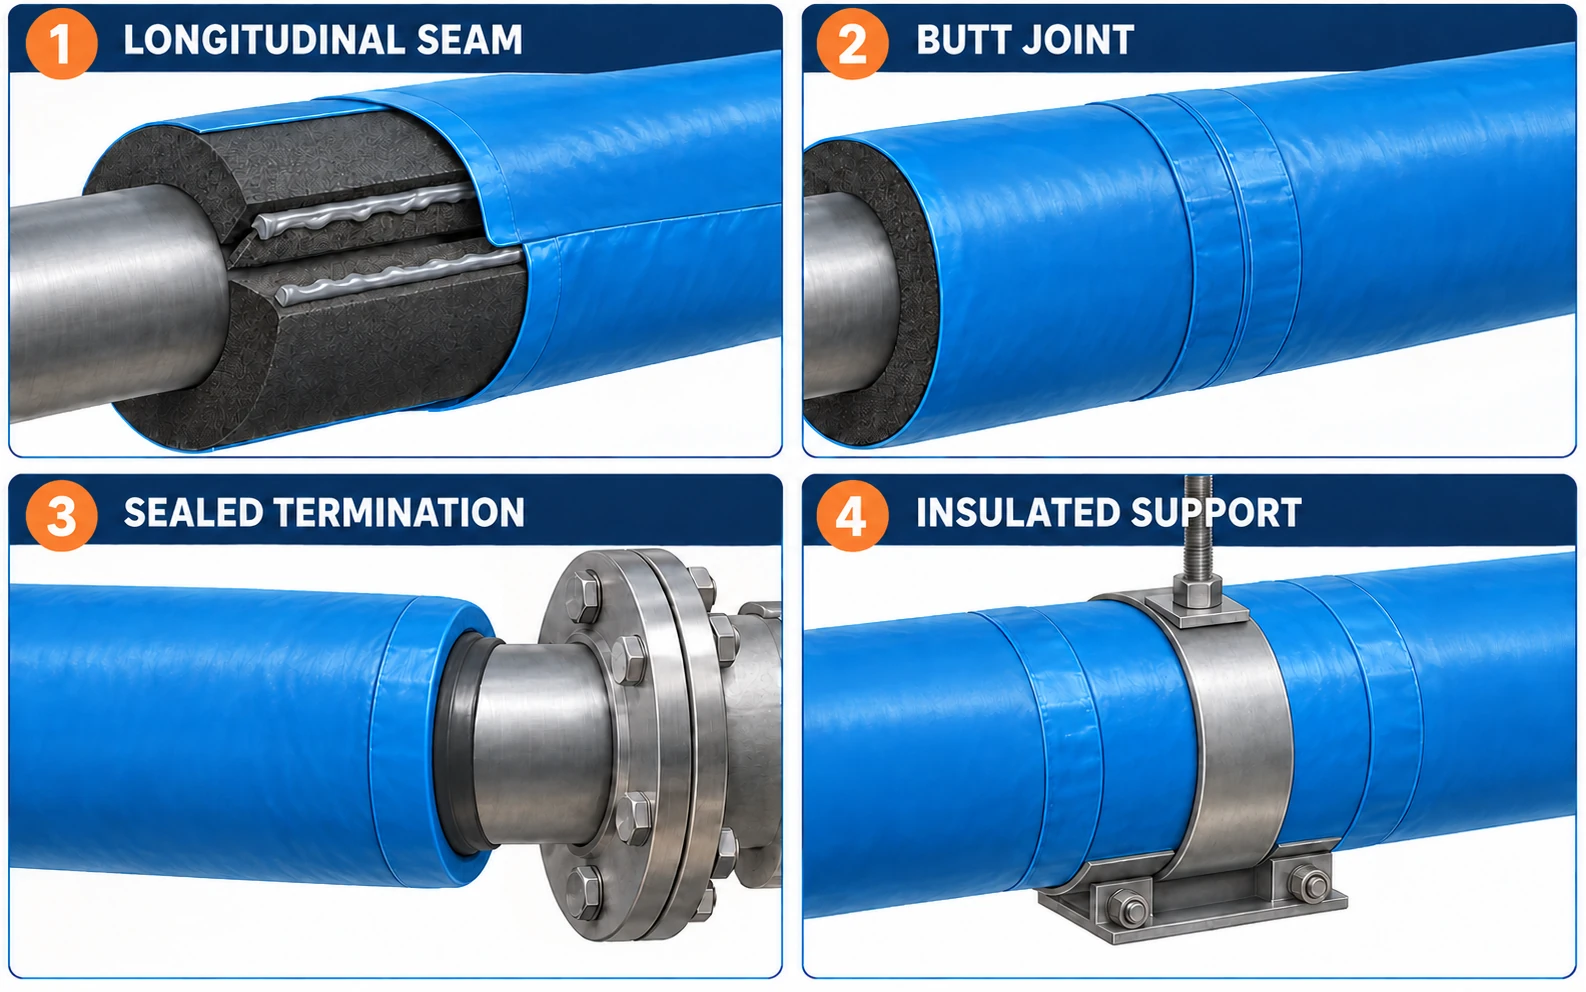
For chilled-water and refrigeration service, seal the vapor-control transition where insulation meets support inserts or structural elements. On hot lines, account for prolonged temperature exposure, pipe movement and the stability of fasteners.
For pipe insulation installation at walls, floors and equipment connections, coordinate insulation with sleeves, penetration seals and the specified surrounding assemblies. Avoid exposed sections at difficult transitions. Where a fire-rated barrier is penetrated, the firestop must independently meet the requirements of its applicable tested or specified system; pipe insulation does not replace that firestop.
Vapor Control on Cold Pipes and Protection Outdoors
After fitting the insulation, select any required vapor-control layer or outer jacket according to operating temperature, humidity and exposure. How to install pipe insulation in a chilled indoor plantroom differs from protecting a pipe exposed to outdoor rain and sunlight.
Chilled-Water and Refrigeration Lines
During cold-service pipe insulation installation, water vapor can condense if it reaches a pipe surface below the surrounding air's dew point. Closed-cell elastomeric insulation resists vapor transmission, but longitudinal seams, circumferential joints, ends, fittings and supports still need reliable sealing. Low vapor permeability in the insulation does not make an open seam acceptable.
For below-ambient pipe insulation installation with glass wool or rock wool, provide a suitably continuous vapor barrier. Seal facing laps, ends, supports and penetrations as connected parts of the system. See Pipe Insulation Vapor Barrier for further details.
Outdoor Pipework
For outdoor pipe insulation installation, protect the assembly against rain, UV exposure, wind and potential impact. Depending on the specification, this may require metal cladding, a weather-resistant jacket or another suitable protective assembly. Arrange overlaps to shed water, and finish ends, penetrations and fasteners to minimize water entry.
On outdoor cold lines, weatherproofing and vapor control serve different purposes. A jacket that sheds rain does not automatically prevent water vapor from reaching insulation; both measures may be necessary. This distinction matters when deciding how to install pipe insulation on exposed chilled-water lines.

Inspect the Completed Pipe Insulation Installation
The final stage of pipe insulation installation is to confirm that the completed assembly meets the specified requirements, not simply that it looks neat. Check the following items before acceptance.
| Inspection item | What to verify |
|---|---|
| Material and dimensions | Material type, bore, thickness and facing match the project requirements. |
| Straight sections | Even fit with no open gaps, damage or excessive compression. |
| Longitudinal and circumferential joints | Tight closure, suitable bonding or fastening, and no visible openings. |
| Elbows, tees and valves | Continuous coverage, well-fitted segments and access for maintenance. |
| Supports and hangers | Correct load transfer, no crushed insulation and continuous critical transitions. |
| Cold-pipe vapor control | Sealed seams, ends, penetrations and support interfaces. |
| Outdoor protection | Correct cladding overlaps, sealed ends and protected penetrations. |
| Final handover | Damage repaired, identification retained and necessary service access available. |
Inspect concealed joints before ceilings, cladding or other finishes cover them, and retain photographs or records where useful for maintenance. After cladding, check overlaps, fasteners, terminations and installation damage. For adhesive-bonded systems, confirm that application and curing requirements are met before returning the line to service.
Insulvora Products for Different Installation Conditions
Insulvora offers several product forms for pipe insulation installation. Product choice affects how to install pipe insulation at joints and fittings; confirm pipe diameter, service temperature and exposure before selecting the material.
Slit NBR/PVC closed-cell elastomeric tubes are available in different bore and wall-thickness combinations. The side-opening form suits compatible air-conditioning, chilled-water, hot-water and mechanical lines within the selected product's temperature range, especially existing runs where the tube cannot be slid on from an open end. Use the closure method specified for that product.
Preformed glass wool pipe sections are available with 22–720 mm bores, 25–100 mm wall thicknesses and a standard 1 m length. They suit compatible mechanical and hot-water applications, with facing, vapor control and protective finishes selected for actual service conditions.
Preformed rock wool pipe sections are available with 22–910 mm bores, 20–150 mm thicknesses and a 1 m length. They serve suitable industrial hot-water, steam and other elevated-temperature applications. Split sections allow band fastening and protective cladding. For complex fittings, discuss available matching elbow, tee, valve-cover or flange options through Rock Wool Pipe Section, subject to project requirements and confirmation.
If your pipe insulation installation requires further material or thickness selection, consult the Pipe Insulation Specification reference before procurement. The appropriate joining and protective system should be confirmed together with the product dimensions.
Confirm Pipe Insulation Products and Project Specifications
Insulvora supplies slit elastomeric foam tubes and preformed glass wool and rock wool pipe sections. Share the pipe material and outside diameter, operating temperature, exposure, required insulation thickness and any fitting or protection details. Insulvora can review suitable product forms, available dimensions and quotation requirements.